Wednesday, January 30, 2008

Thing 6 -- Image Generators

Image generators allow you to easily manipulate images and graphics to create fun images like the ones you see on this post.

For this discovery exercise, we will just have fun. Find a few fun image or text generators to play around with and write a post in your blog about some of your favorites and display the results. Often adding the image you mocked up to your blog is as simple as copying and pasting code that the page provides. If not, you may just need to right click on the image and then save it to your hard drive before using Blogger’s image button (see Thing 5 for directions) to add it to your post. If you’re having difficulty getting your image added to a post in your blog, ask a classmate for help.

ImageChef.com - Custom comment codes for MySpace, Hi5, Friendster and more ImageChef.com - Custom comment codes for MySpace, Hi5, Friendster and more

Discovery Resources:

Homework Exercise:

  • Play around with some image generators and find a few that you like.
  • Post the results of your discovery process in your blog. Let's see your images!
  • Note: Be sure to include a link to the image generator itself, so other participants can discover it too.
  • So take some time and have fun with this exercise.
Hint for adding (embedding) "code" to your blog post:

Here's some instructions for SignGenerator.org. This will work for most image generator sites.

  • Generate your image and the scroll down to the "Get HTML" link.
  • When the page displays, find the embed code and put your cursor on it.
  • Use (CTRL) A to select all the code
  • Use (CTRL) C to copy the code (or however you usually do it)
  • Go to your blog and create a new post.
  • On the "Edit Html" tab, paste in the code.

[Note: Please remember to include Web tool and THING# in your heading posts.]

Thing 5 -- Discover Flickr

Explore Flickr and learn about this popular image hosting site. Photo sharing websites have been around since the 90s, but it took a small startup site called Flickr (and now owned by Yahoo) to catapult the idea of “sharing” into a full blown online community. Flickr uses "tags" or what we would call keywords to help identify and search for photos.

For this discovery exercise, you are asked to take a good look at Flickr and discover what this site has to offer. Find out how tags work, what groups are, and all the neat things that people and other libraries are doing with Flickr.

Discovery Resources:

  • Watch the CommonCraft video, Online Photo Sharing in Plain English

Homework Activities:

  • Take a good look around Flickr and discover an interesting image that you want to blog about. Be sure to include either a link to the image or if you create a Flickr account, you can use Flickr's blogging tool to add the image in your post. Another option you have for including images in your post is to use Blogger's photo upload tool. (see the extra activity below)
  • Create a free account in Flickr (you can use your Yahoo mail ID that you set up to make your avatar!) and use your digital camera to capture a few pictures of something in your library or other things you like to do. Upload these to your Flickr account and tag at least one of the images MediaClerks23Things and mark it public. Then create a post in your blog about your photo and experience. Be sure to include the image in your post.

Learn to add photos to your blog:

  • GET AN IMAGE - Use your own digital camera or check one out from your library. Take some library photos or any other photos that would work on your blog. Upload the images to your flashdrive or a CD (be sure they are in *.jpg format). If you don’t know how to do that, bring your camera (with the photos you have taken) to class.
  • POST THE IMAGE TO YOUR BLOG - Go to your blog and start a new post.
  • Find the "Add Image" icon and click on it.
  • Select BROWSE and browse to the directory with your image. Change the size and position if you like.
  • Select UPLOAD.
  • When the image is uploaded, it will appear at the top of your post. Drag and drop it wherever you want it.
  • When you are ready to publish, select "Publish Post".
  • Or...explore the very cool feature in Flickr to post to your blog directly from a photo in Flickr. Here's instructions for Flickr's blogging features.

More Flickr Fun:

Like many web 2.0 sites, Flickr has encouraged other people to build their own online applications using images found on the site. Through the use of APIs (application programming interfaces), many people have created third party tools and mashups* that use Flickr images. Here is just a sampling of a few …

Discovery Exercise 5 1/2:

Explore some of the fun Flickr mashups* and 3rd party tools that are out there. Create a mashup* in BigHugeLabs, insert it in your blog, and post about one that intrigues you.

* Mashup Note: Wikipedia offers some great articles that explain mashups. Basically they are hybrid web applications that take features from one application (like Flickr) and mash it up with another (like a map). In this example, you get Mappr (http://mappr.com/).

**: A quick word about photo posting etiquette and responsibility - When posting identifiable photos of other people (especially minors) is it advisable to get the person's permission before posting their photo in a publicly accessible place like Flickr. It is a good idea to just use initials or a nickname -- don't use any other identifiers such as school name. We'll talk about Internet safety in a future session. Never upload pictures that weren't taken by you (unless you have the photographer's consent) and always give credit when you include photos taken by someone else in your blog.

If you want to upload an image from Flickr posted by someone else, check for it's copyright status - it shouldn't be used if it says anything like 'all rights reserved' or 'copyright J.Doe'. Look instead for an image with a Creative Commons license.


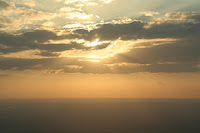
Image Citation:Sparrow, Tom. “Flying Sunset.” Tomsparrow’s Photostream. 11 Sep 2007. 21 Jan 2008 http://flickr.com/photos/spidge/1360010165/.

Go to Flickr and use the option in the Advanced Search to specify that you want an image released under Creative Commons. Embed that image in your blog, remembering to include the link to the image name and the person who uploaded it. If you use the "Blog This" feature in Flickr, an attribution will be included under the image in your blog.

For Flickr's CC licence definitions, searches, etc, click here: http://www.flickr.com/creativecommons/.

Here's some great free photo editing tools to edit, adjust, and resize your photos. Remember that you can edit your photos from inside Flickr, too.

Pixer
Phixr
PXN8
Snipshot

Wednesday, January 23, 2008

Thing 4 -- Technorati

So now that you’ve been blogging for awhile, you might be wondering just how big is the blogosphere? Well according to San Francisco based Technorati, the leading search tool and authority for blogs, there are “over 175,000 new blogs (that’s just blogs) every day. Bloggers update their blogs regularly to the tune of over 1.6 million posts per day, or over 18 updates a second.” Technorati currently tracks 112 million blogs. Yes, these numbers are astounding, but as you’ve already seen for yourselves, blogging is so easy that these publishing tools are being taken advantage of by almost every industry, including libraries. There are a lot of features in Technorati including the capability to search for keywords in blog posts, search for entire blog posts that have been tagged with a certain keyword, limit a search by language, or search for blogs that have been registered and tagged as whole blogs about a certain subject (like photography or libraries).

Homework Activities:


  • Take a look at Technorati Search and try doing a keyword search for library related topics in Blog posts, in tags and in the Blog Directory. Search for libraries, school libraries, library 2.0, and other search terms. Are the results different?
  • Explore popular blogs, searches and tags. Is anything interesting or surprising in your results?
  • Explore the sections such as Politics, Front Page, and Technology. How could you use this in your personal searches? ...searches for library related content?
  • Find some interesting blogs on this site (i.e. library sites, technology sites, etc.). Favorite a few. Add some of them to your Bloglines account if they are something you'd like to read on a regular basis.
  • Create a blog post, on your blog, about your discoveries on this site. "Thing #4 -- Technorati".

If you want more (optional, advanced):

You may be interested in blogging after we are done with our class; perhaps on something you like such as gardening, quilting, etc. So how do you get your blog listed as part of the blogosphere and how can you tag your posts with keywords to make them more findable through a Technorati search? The answer to the first question is that your blog is probably already being captured by Technorati due to the fact that you’re already using
Blogger, the most popular blogging tool. But if you want to join the party and have your blog officially listed on Technorati and also take advantage of the watchlist and other features, you’ll need to claim your blog yourself.

As for tagging posts with Technorati tags? This is easy too. All you need to do is add a little bit of HTML code to the bottom of your post (see example below) and Technorati will pick up these tags when it spiders (or
web crawls) your site.

If you're up for a challenge, learn how to
tag your posts with Technorati tags so they can become part of Technorati tag searches. Create a post about something. It can be anything you want and add the HTML code to the bottom to tag it as “LibraryLearning2.0.” You may also want to consider claiming your blog and creating a watchlist. NOTE: When adding HTML code, you'll want to make sure you're in Blogger's Edit HTML window. There's a lot to explore.

Thing #3 -- RSS

You’ve heard of RSS? You’ve seen those small funny tags on websites? You’ve heard co-workers and acquaintances swear by it, but still have no idea what RSS is?

In the information world, RSS is not only changing the way news, media and content creators share information, but it also is swiftly changing the way everyday users are consuming information.

RSS stands for “Really Simple Syndication” and is a file format for delivering regularly updated information over the web.

Just think about the websites and news information sources you visit every day. It takes time to visit those sites and scour the ad-filled and image-heavy pages for just the text you want to read, doesn't it? Now imagine if you could visit all those information sources and web pages in just one place and all at the same time … without being bombarded with advertising… without having to search for new information on the page you’d already seen or read before… and without having to consume a lot of time visiting each site individually. Would that be valuable to you? Well, it’s available now through a newsreader and RSS.

This week’s discovery exercises focus on learning about RSS news feeds and setting up a
Bloglines account (a free online newsreader) for yourself to bring your feeds together.

Discovery Resources:


CNET Video: RSS – Feel the Need for Feeds (3:32) – a good over view of what RSS is and the benefits to users.
  • What is RSS? A good text review of Really Simple Syndication.
  • Using Bloglines Tutorial (how to keep up with dozens of blogs everyday) – This online tutorial walks you through how to setup a Bloglines account and add newsfeeds. Follow Steps 1 to 3 to set up your Bloglines account. Steps 4 – 9 are optional and cover how to subscribe to different types of feeds (podcasts, Flickr albums, etc).
  • Homework Activity:

    1. Follow the discovery resources above to learn more about RSS and newsreaders.

    2. Create a free online Bloglines account for yourself and subscribe to at least ten (10) newsfeeds and blogs to your reader. See Using Bloglines Tutorial steps 1-3 for instructions.

    3. Subscribe to several of your class participants' feeds. This is as easy as typing the blog URL into the subscribe field in Bloglines. Try it, it's easy!

    4. Create a post in your blog about this exercise. Optional: If you're up to the challenge, you can provide the URL address to your public bloglines account.

    Don’t know what to blog about? Think about these questions:

    • What do you like about RSS and newsreaders?
    • How do you think you might be able to use this technology in your work or personal life?
    • How can libraries use RSS or take advantage of this technology?

    If you want more:

    1. Set up an account in Google Reader. If you like it better than Blogline, write a post on the differences.
    2. Try Pageflakes, Netvibes, or iGoogle. All allow you to set up a homepage whereby you can subscribe to newsfeeds, blogfeeds, and add useful tools to your homepage. This is great way to increase your personal productivity, efficiency, and have all your favorite tools all on one page. You can pull up this web-based homepage from any computer.
    3. Everything you every wanted to know about RSS resources: The Ultimate RSS Toolbox - 120+ RSS Resources.
    4. Seven Tools for creating a RSS Feed from any Website -- a bit more advanced, but has useful links.

    Wednesday, January 16, 2008

    Thing #2 -- Blogging

    Now that you’ve done some exploring and understand how this program will work, it’s time to setup your own personal blog. Why blog? To reflect on what you are learning and take part in conversations online.

    Your blog is where you will record your thoughts, discoveries, and applications in the Library Learning 2.0 for Media Clerks. We are using Blogger, which is owned by Google.
    Blogger is a popular free online blog hosting service that is extremely easy to use.

    Creating a blog using
    Blogger takes just three steps:
    1. Create an account (view
    screenshot)
    2. Name your blog (view
    screenshot)
    3. Select your template. (view
    screenshot)

    Discovery Exercises:


  • Find some interesting blogs at Google Blogs. Read a few blogs to get a feel for the structure, how they work, and what kinds of topics people blog about.
  • Homework Activity:

    1. Set up your own blog. There are many different blogging service providers such as Blogger, Wordpress, Edublogs, Live Journal, and TypePad. For this class we will use Blogger for a few reasons: it is easy to learn and use, you probably already have a Google account you set up to access the Media Clerk's Forum blog, and we will all be on the same provider.

    2. Write your first two posts. One for your refection on Thing #1 -- Learning and Web 2.0, and then your reflection on Thing #2 -- Blogging. Each new entry should include the "Thing" number about which you are writing. Include your thoughts on how blogging could be useful for you personally. Would it be valuable in the library? How?

    3. Register your blog with me by sending the URL of your new blog (your Internet address) to me by clicking here.

    4. Read all your classmate's blogs. As they are registered, the links will appear on the sidebar under Participant Blogroll. Make some comments on their posts.
    5. Feeling adventurous? Add your avatar to your blog. Use a photo of yourself. You can resize it here. Be sure to use a closeup of your face as the avatar icons are very small. Make an avatar at the Yahoo Avatar site. You can set up a free account and use the avatar maker. There are lots of other avatar sites out there -- explore!


    Some Blogging Suggestions:

    1. Name each of your post with the “Thing” number about which you are discussing. For instance: Your first Post might be: Thing #1 – My Thoughts on Web 2.0.
    2. Comments are the “life blood” of bloggers. Take some time to read other blogs and always try to leave a meaningful comment. “I agree” or “Right on!” are generally not meaningful comments.
    3. Your blog posts should be at least 100-150 words each week - we'd like to have a conversation and the more you post, the better the conversation will be.
    4. Always “tag” your posts. We will talk more about this in a couple of weeks. Tagging is a label you add to organize and index your posts – readers can find all your posts dealing with any topic. It is also a great tool for you to easily track your post topics. Hey! We're librarians -- we love to catalog everything!
    5. We will learn to add all kinds of items to your blog: photos, videos, widgets, feeds, and all sorts of useful tools for your readers. Stay tuned…
    6. Don’t be afraid to explore, experiment, and be creative. Have fun!

    If you want MORE:

    Read some of the popular library blogs:

    What are students doing in the blogosphere? Check out these student blogs:

    Create a blog post with your thoughts about these blogs.

    Thing #1 -- Learning About Web 2.0

    The goal of this class is to encourage library staff to learn more about emerging technologies on the web that are changing the way people, society and libraries access information and communicate with each other. The Web has evolved from simply being sites and search engines to a shared network space that drives work, research, education, entertainment and social activities. Web 2.0 could be described as:

    • Creativity – using free tools of the Internet to design and create Web content.
    • Connected – constantly connected to your PLN, your family, your friends, your employer, your future employer, your students, your peers, professionals in your field, and the world.
    • Collaboration – Social networking and Web 2.0 are all about strengthening relationships; designing, creating, and sharing the learnings from conversations
    • Conversations – about anything that interests you…from crafts, to education, to libraries, to the most current scientific research available. Conversations with your PLN – as small or as large as you want to make it.
    • Content -- user-generated content. We all have the ability to join the conversation and add to the content of the web, instead of just consume data.

    Homework Activity:

    Read some of the following articles and post your thoughts on Web 2.o. What does it mean to you, our students, and the library?

    We will explore many tools of Web 2.o in our PST, but we will only be scratching the surface. New content, tools, and conversations are being created daily.

    If you want MORE:

    Read some of the educational technology and teaching blogs. Post your thoughts.